

Laser Cutting Burrs are one of the most common quality problems in metal laser cutting. A part may be cut through, but the bottom edge still has rough slag, sharp residue, or uneven dross. For factories that need clean edges, accurate assembly, or less manual grinding, this problem can directly affect production cost.
In most cases, burrs do not come from one single reason. They often appear when laser power, cutting speed, focus position, assist gas, nozzle condition, material thickness, and machine stability do not match each other.
This guide explains why Laser Cutting Burrs happen and how operators can reduce them in daily production.
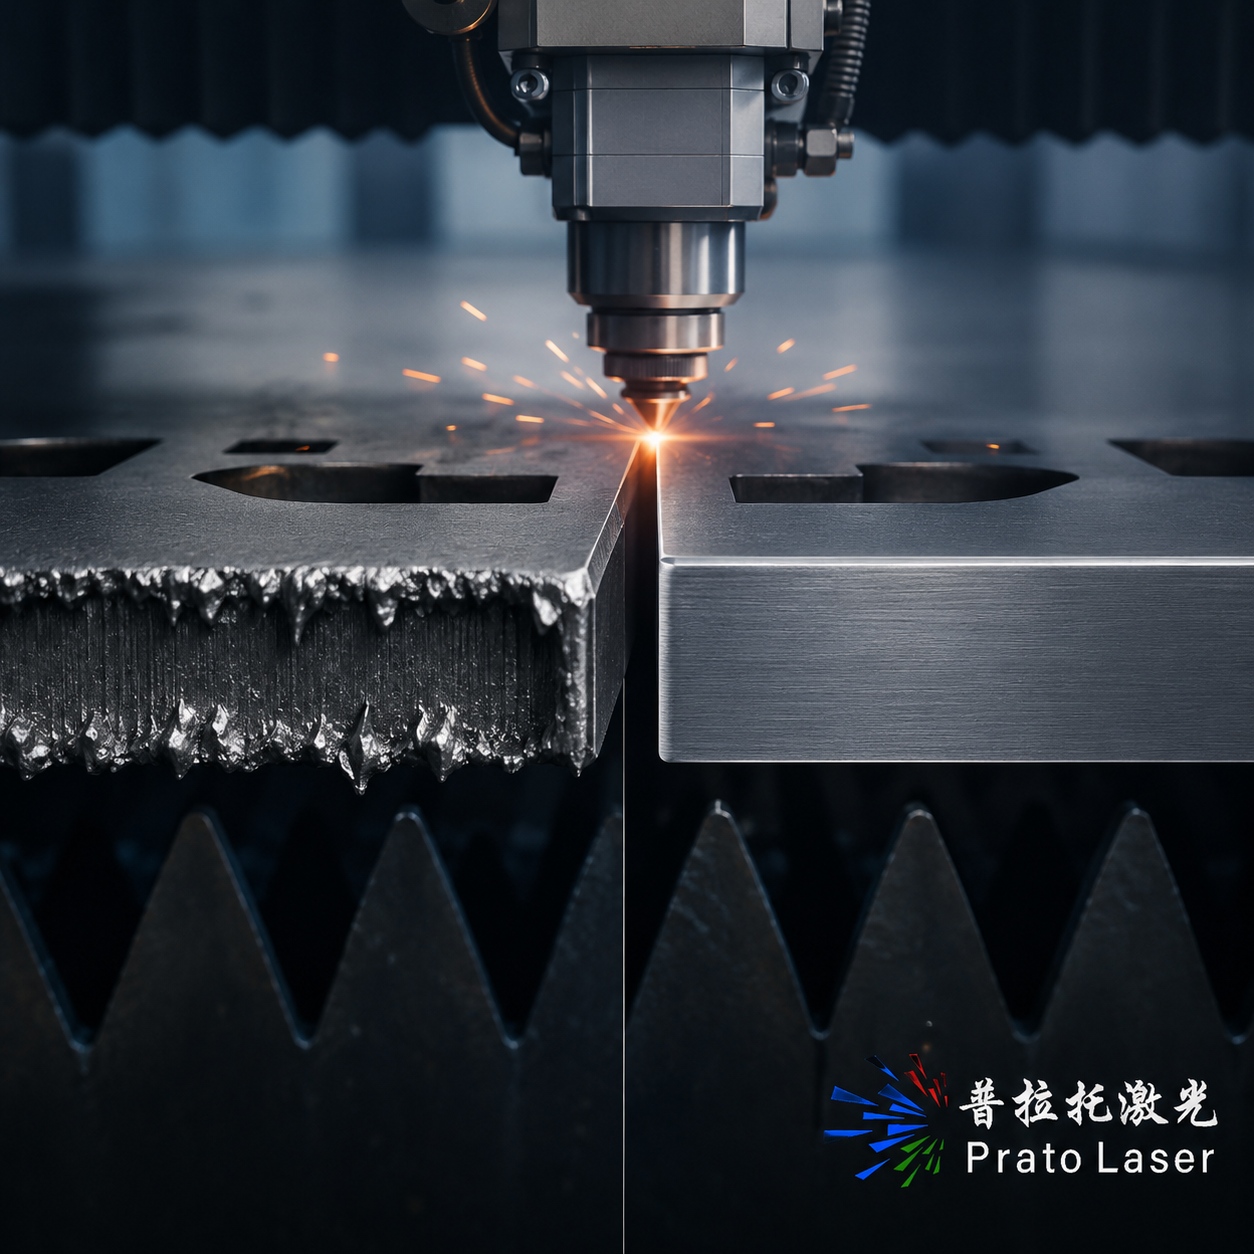
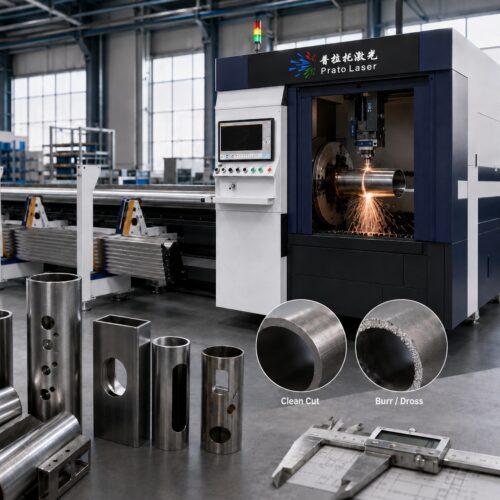
Laser Cutting Burrs are rough edges or solidified molten metal left on the lower side or sidewall of a cut part. They are sometimes called dross or slag, depending on the material and cutting condition.
During laser cutting, the laser beam melts the metal along the cutting path. At the same time, assist gas should push the molten metal out of the kerf. If the molten metal cannot leave the cutting area smoothly, it may stick to the edge and cool into burrs.
A technical article from The Fabricator on burr-free laser cutting explains that burr-free cutting depends on the right match between beam parameters and gas flow dynamics. In practical terms, operators need stable energy input and strong, well-directed gas flow to remove molten metal cleanly.
Some small burrs may look like a minor issue, but they can create real problems in production.
First, burrs increase secondary processing. Workers may need to grind, polish, or deburr parts before welding, painting, bending, or assembly. This adds labor cost and slows delivery.
Second, burrs can affect part accuracy. If the edge is uneven, parts may not fit correctly during assembly. This is especially important for electrical cabinets, machinery covers, brackets, automotive parts, and precision sheet metal components.
Third, burrs can create safety risks. Sharp edges can hurt operators during unloading, sorting, or assembly. Therefore, reducing burrs is not only about appearance. It also improves workflow, quality, and safety.
Laser Cutting Burrs usually come from a mismatch between cutting conditions. The most common causes include cutting speed, laser power, focus position, assist gas, nozzle condition, material quality, and machine stability.
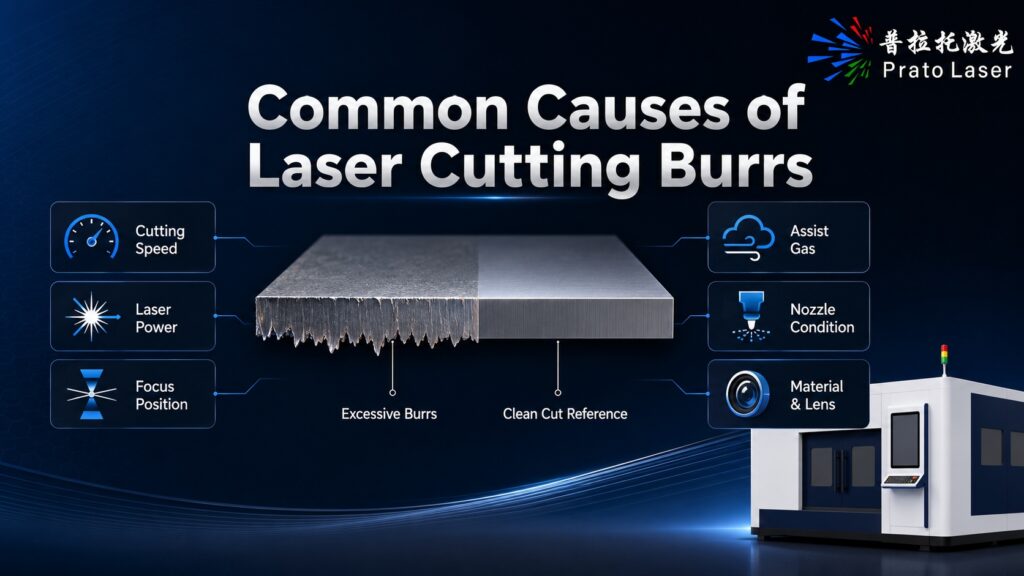
Cutting speed has a direct influence on burr formation.
When the speed is too fast, the laser may not fully melt the material. The molten metal cannot be removed completely, so hard burrs appear on the bottom edge.
When the speed is too slow, the material receives too much heat. This can create excessive melting, wider kerf, rough edges, and heavy slag.
A good cutting result needs a balanced speed range. The machine should cut fast enough to control heat input, but slow enough to complete melting and material removal.
Laser power should match the material type and thickness.
If the power is too low, the beam may not fully penetrate the material. In that case, the cutting edge becomes rough, and burrs appear because the material does not separate cleanly.
If the power is too high, the cutting zone may overheat. This can create a larger molten pool and make the edge rougher, especially on thin sheets.
For thin sheet metal, lower or medium power may be enough. For thicker carbon steel, stainless steel, or aluminum, higher power may improve cutting ability and speed. However, higher power alone does not guarantee a burr-free edge. The cutting speed, focus, gas, and nozzle must also match the power level.
For factories comparing machine configurations, Prato Laser provides fiber laser cutting machine solutions for carbon steel, stainless steel, aluminum, brass, galvanized sheet, and other metal materials.
Focus position controls where the laser energy concentrates inside the material.
If the focus is too high or too low, the energy distribution changes. As a result, the material may melt unevenly, the kerf may become unstable, and molten metal may not flow out smoothly.
For thin materials, operators often use a focus position that supports faster and cleaner cutting. For thicker plates, the focus setting may need to change to improve penetration and bottom edge quality.
Incorrect focus is one of the most common reasons for bottom burrs. When burrs appear suddenly, operators should check the focus setting before changing too many other parameters.
Assist gas plays an important role in reducing Laser Cutting Burrs. It helps blow molten metal out of the kerf and supports the cutting process.
If gas pressure is too low, molten metal stays near the bottom edge and forms burrs. If gas pressure is too high, airflow may become unstable and disturb the molten pool. Both situations can reduce edge quality.
The best gas pressure depends on material, thickness, nozzle size, cutting speed, and gas type. For stainless steel, nitrogen is often used when factories need a cleaner and brighter edge. For carbon steel, oxygen can support cutting through an oxidation reaction. Compressed air can reduce operating cost in some applications, but the edge quality may not match nitrogen cutting.
Buyers who process different materials should test gas type and pressure during sample cutting instead of using one setting for every job.
The nozzle directs assist gas into the kerf. If the nozzle has damage, blockage, poor alignment, or wrong size, the gas flow cannot remove molten metal efficiently.
A small nozzle problem can create a big quality problem. For example, if the nozzle is not centered with the laser beam, one side of the cut may be clean while the other side has burrs. If spatter blocks the nozzle, gas flow becomes weak or uneven.
Operators should check these points regularly:
This simple inspection can prevent many burr problems.
A dirty or damaged protective lens can reduce beam quality. When the beam becomes unstable, cutting performance drops, and burrs may appear even if the cutting parameters look correct.
Operators should also check the cutting head, ceramic ring, sensor, and height control system. If the cutting head cannot maintain the correct distance from the material surface, gas flow and focus position may become unstable.
For industrial production, maintenance is part of cutting quality. A machine with good hardware still needs clean optics, correct calibration, and regular inspection.
Material condition can also affect Laser Cutting Burrs.
Rust, oil, thick oxide layers, uneven coating, poor flatness, and inconsistent material thickness can all reduce cutting stability. Even with the same machine and parameters, different material batches may produce different edge results.
For galvanized sheet, coated material, aluminum, brass, or thick carbon steel, sample testing is especially useful. It helps operators confirm whether the selected parameter set can produce acceptable edge quality.
Burrs can also appear when the machine movement is unstable. Vibration, poor acceleration control, loose mechanical parts, or unstable worktable support may affect cutting quality.
A stable machine bed, reliable guide rail, accurate rack and pinion system, and intelligent CNC control system help the laser head move smoothly. This is important for long cutting paths, small holes, sharp corners, and batch production.
For factories that need faster and more stable sheet metal production, Prato Laser also offers high-speed fiber laser cutting machine solutions for industrial sheet metal processing.
Different materials create different burr problems. Operators should adjust parameters according to the material instead of using the same logic for every job.
Carbon steel burrs often come from incorrect oxygen pressure, unsuitable speed, wrong focus, or insufficient power. Thick carbon steel may produce heavy slag if heat input and gas flow are not balanced.
For carbon steel cutting, operators should check oxygen pressure, cutting speed, focus position, nozzle size, and piercing quality.
Stainless steel burrs often appear when nitrogen pressure is not enough, speed is too fast, focus is wrong, or nozzle alignment is poor.
Because stainless steel is often used for visible parts, edge quality is important. Kitchen equipment, elevator panels, cabinets, and decoration parts usually require cleaner edges and less polishing.
Aluminum is more reflective and thermally conductive than carbon steel. Burrs may appear when the machine power, speed, gas pressure, and focus are not balanced.
For aluminum cutting, buyers should pay attention to laser source stability, cutting head protection, parameter testing, and material surface condition.
Brass and copper are highly reflective materials. They usually require careful parameter testing and stable machine configuration. Burr problems may become more obvious if power, gas, and focus are not properly matched.
Before buying a machine mainly for brass or copper, sample cutting is strongly recommended.
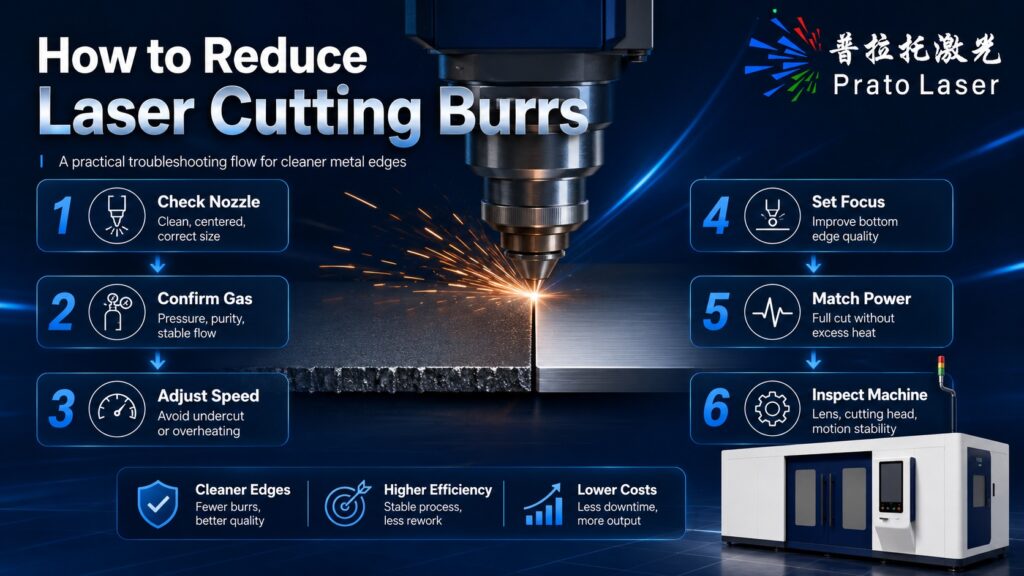
Reducing burrs requires a step-by-step troubleshooting process. Operators should avoid changing too many parameters at the same time. It is better to adjust one factor, check the result, and then move to the next step.
Before changing power or speed, inspect the nozzle. Make sure it is clean, round, centered, and suitable for the material thickness.
A damaged nozzle can make good parameters look bad.
Check gas type, pressure, purity, and flow stability. Also check whether the gas line has leakage or pressure drop.
If molten metal cannot leave the kerf, burrs will remain on the bottom edge.
If the edge has hard burrs and incomplete cutting signs, the speed may be too fast. If the edge has heavy slag and overburning, the speed may be too slow.
Find the stable speed window for the material and thickness.
Change focus carefully and record the result. A small focus adjustment can improve bottom edge quality, especially on medium-thick and thick materials.
Power should support full penetration without excessive heat input. If power is too low, the material may not cut cleanly. If power is too high, the edge may become rough.
Check the protective lens, cutting head, ceramic ring, height control, worktable support, and mechanical movement. A maintenance issue can create burrs even when the parameter table looks correct.
If burr control is important for your production, check these points before buying a machine:
A good laser cutting machine should not only cut through the material. It should also help factories produce stable, clean, and repeatable parts.
Sample cutting is one of the best ways to evaluate burr control.
Catalog data can show general cutting capacity, but real cutting results depend on material grade, thickness, surface condition, gas, machine configuration, and operator requirements.
During sample cutting, buyers should check the bottom edge, sidewall roughness, burr level, heat-affected zone, cutting speed, and part accuracy.
For stainless steel, aluminum, brass, copper, and thick carbon steel, sample testing is especially valuable before confirming the final machine configuration.
Prato Laser provides industrial laser solutions for sheet metal cutting, tube cutting, welding, cleaning, and marking. For metal cutting applications, Prato Laser can help buyers evaluate material type, thickness range, cutting quality requirement, production volume, and suitable machine configuration.
For buyers who already know their burr problem, it is helpful to prepare material type, thickness, current power, speed, gas type, gas pressure, and clear photos of the cutting edge. With this information, engineers can provide more practical parameter suggestions.
For new machine buyers, sample cutting and technical consultation can help confirm whether the selected machine can meet production quality requirements.
You can explore Prato Laser laser cutting machine options or contact the team through Prato Laser for machine selection and sample testing support.
Laser Cutting Burrs are usually a sign that the cutting process is not balanced. The problem may come from speed, power, focus, gas pressure, nozzle condition, material quality, or machine stability.
The best solution is not to change parameters randomly. Operators should check the nozzle, gas, speed, focus, power, optics, and machine condition step by step.
For buyers, burr control should be part of the machine selection process. A stable fiber laser cutting machine, proper sample testing, and reliable technical support can help reduce secondary processing and improve production efficiency.
Laser Cutting Burrs are usually caused by mismatched cutting speed, unsuitable power, incorrect focus, weak assist gas flow, damaged nozzle, dirty protective lens, poor material condition, or unstable machine movement.
Start by checking the nozzle, assist gas pressure, cutting speed, focus position, and power setting. Then inspect the protective lens, cutting head condition, material surface, and machine stability.
Stainless steel burrs often come from insufficient nitrogen pressure, wrong focus, unsuitable cutting speed, nozzle misalignment, or dirty optics. Sample testing can help find a better parameter range.
Not always. Higher power can help cut thicker materials, but too much power may create excessive heat and rough edges. Burr control depends on the balance of power, speed, focus, gas, and nozzle condition.
Many materials and thicknesses can achieve very clean edges with the right machine and parameters. However, real results depend on material quality, thickness, gas system, machine stability, and production requirements.


English